
Whether you're boondocking in the wilderness, camping at an off-grid site, or simply want the flexibility to power your household electronics without hooking up to shore power, installing a power inverter in your RV is a smart move. A quality inverter allows you to use everyday appliances, like a coffee maker, laptop, or microwave, using the power from your RV's battery bank.
In this step-by-step guide, you'll learn exactly how to install a power inverter in your RV or camper. We'll walk you through choosing the right type of inverter, the tools and parts you'll need, and how to wire everything safely and efficiently. Whether you're setting up your first off-grid RV system or upgrading your motorhome for more reliable power, this guide has you covered.
You May Also Need:
How to Install a Power Inverter in a Truck [Best Guide]
Will a Power Inverter Drain My Battery? Here's the Answer!
Why You Need a Power Inverter in Your RV
RVs and campers are designed to offer the freedom of the open road, but without a reliable power source, your experience can quickly become uncomfortable. A power inverter for a camper or motorhome is essential if you plan to spend time away from hookups or campsites with shore power.
A reliable RV inverter converts DC (direct current) electricity stored in your RV's batteries into AC (alternating current) electricity, which is what most household appliances and devices use. Without an inverter, you won't be able to run essentials like your microwave, coffee maker, laptop, or TV unless you're plugged into a generator or grid power.

Pure Sine Wave vs Modified Sine Wave Inverters
Before choosing the right RV power inverter, it's important to understand the two main types:
-
Pure sine wave inverters deliver clean, stable AC power that closely mimics the electricity from your home outlet. They're ideal for sensitive electronics and high-efficiency appliances like laptops, smart TVs, and medical equipment.
- Modified sine wave inverters are less expensive but produce a rougher waveform that may cause overheating or malfunction in certain devices, especially those with digital controls or variable-speed motors.
For long-term reliability and compatibility with modern appliances, pure sine wave inverters are the best choice for RVs and campers.
How to Choose the Right Inverter for a Camper or RV
Now that you understand why an inverter is essential for RV living, the next step is choosing the right one for your specific needs. Your ideal inverter for a camper or motorhome will depend on several key factors: how much power you use, what type of battery system you have, and which appliances you want to run during your trips.
Generally speaking, the higher your power demand and the more devices you plan to run simultaneously, the larger the inverter you'll need. It's also important to match your inverter size with your battery bank capacity to avoid overloading the system.
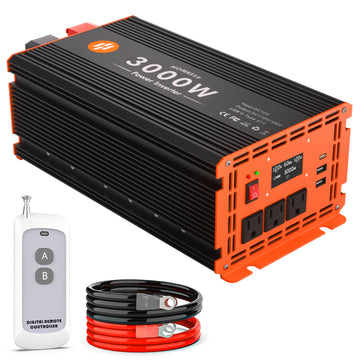
Recommended: Topbull Pure Sine Wave Inverters
If you're looking for reliable and easy-to-install options, Topbull's pure sine wave inverters are a top choice for RV and camper setups. They deliver clean, stable power and come in a variety of sizes to fit different needs:
-
2000W Pure Sine Wave Inverter – Ideal for essential electronics like laptops, LED lighting, ceiling fans, or a single coffee machine. Great for minimalist setups or weekend campers.
-
3000W Pure Sine Wave Inverter – Perfect for moderate energy use, such as powering a small microwave, smart TV, toaster oven, and multiple charging devices.
- 4000W Pure Sine Wave Inverter – Best for larger RV systems where you need to run high-wattage appliances like a refrigerator, full-size microwave, or multiple AC outlets at once.

Topbull inverters are engineered for RV use, offering high efficiency, built-in safety features, and straightforward installation, making them a solid option whether you're upgrading or doing a fresh RV inverter installation.
What You'll Need for Motorhome Inverter Installation
Before you start installing an RV inverter, it's important to gather all the necessary tools and components. A well-prepared installation not only saves time but also ensures a safe and efficient setup. Whether you're wiring an inverter in your camper or upgrading your motorhome's electrical system, make sure you have everything listed below.
-
Pure sine wave power inverter – Delivers clean AC power to your appliances.
-
Appropriately sized DC cables – The thicker the cable, the less voltage drop. Always size based on your inverter's wattage.
-
Inline fuse or circuit breaker – Protects your system from overcurrent and short circuits.
-
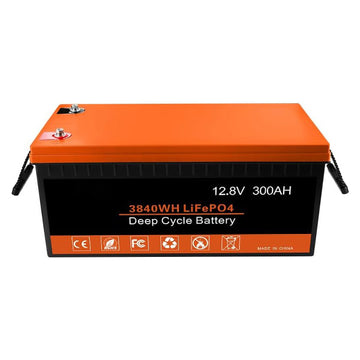
Battery bank – Deep cycle batteries (AGM or lithium) are ideal for RV setups.
-
Mounting brackets or hardware – Secure the inverter in place during travel.
-
Wire crimping and stripping tools – For clean, secure electrical connections.
-
Multimeter – To measure voltage and test connections.
- Safety gear – Insulated gloves and safety glasses to protect yourself while working.
These items are crucial whether you're performing a full motorhome inverter installation or a simple inverter replacement in a travel trailer or van.
Safety First: Precautions Before RV Inverter Installation
Handling electrical systems always carries some risk, so be sure to follow these safety guidelines before and during the installation process:
-
Disconnect all power sources – This includes shore power and the battery bank.
-
Wear protective gear – Insulated gloves and safety glasses are a must when handling wires and terminals.
-
Work in a dry, well-ventilated space – Moisture can increase the risk of electric shock or corrosion.
- Use proper cable size and fuse ratings – Undersized wiring or improper fusing can cause overheating and equipment failure.
Taking a few extra minutes to ensure safety can prevent costly damage and keep your RV trips trouble-free.
Step-by-Step: How to Install a Power Inverter in an RV
Now that you've gathered your tools and components, you're ready to start the installation. Follow these detailed steps to ensure a safe and efficient RV inverter installation. Whether you're installing a pure sine wave inverter in your camper for the first time or upgrading an existing system, this guide will walk you through each step.
Step 1: Choose the Right Location
The first and most important step is choosing the right location for your inverter. A good location ensures maximum efficiency and longevity for your system.
-
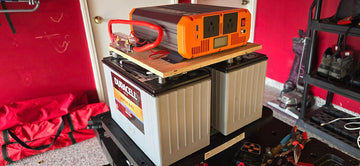
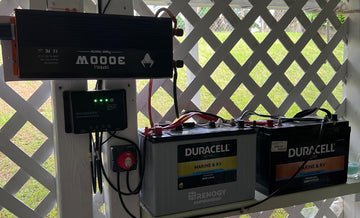
Proximity to the battery bank: Mount the inverter close to the battery to minimize voltage drop. This helps the inverter perform optimally.
-
Ventilation: Inverters generate heat, so it's crucial to place them in a well-ventilated area to ensure proper heat dissipation and prevent overheating.
- Avoid hazards: Make sure the location is away from flammable materials (like paper or gasoline) and moisture (water exposure could cause electrical short circuits).
Choosing the proper spot now can save you trouble later by improving performance and safety.
Step 2: Mount the Inverter
Next, secure the inverter in place to ensure it stays firmly in position during travel.
-
Use mounting brackets or screws: Mount the inverter securely to prevent vibrations from loosening connections while driving.
-
Leave space for airflow: Make sure there's adequate space around the inverter for air circulation. This is important for cooling, as an overheated inverter could reduce efficiency or shut down.
Proper mounting ensures that your inverter stays stable and works efficiently while minimizing the risk of damage from movement.
Step 3: Wire the Inverter
Now it's time to connect the inverter to your battery bank.
-
Connect the positive (+) terminal: Attach the inverter's positive terminal to the positive terminal of your battery with an inline fuse. This fuse acts as a safeguard, protecting the system from short circuits and overloads.
-
Connect the negative (-) terminal: Link the inverter's negative terminal to your battery's negative terminal or chassis ground.
- Secure and insulate connections: It's crucial to ensure all wire connections are tightly secured and insulated to avoid shorts, which could cause sparks or electrical failure.
Take extra care during this step to avoid mistakes that could damage the system or cause safety hazards.
Step 4: Ground the Inverter
Proper grounding is essential for safety and the inverter's proper functioning.
- Ground the inverter to the RV chassis: Use heavy-duty grounding wire to attach the inverter's ground terminal to the RV's chassis. A good ground connection ensures that electrical surges are safely redirected to the ground.
- Ensure a clean connection: Before grounding, make sure the contact point is free of paint, rust, or dirt. A clean connection ensures better conductivity and safety.
A solid ground connection helps protect your system from electrical faults and prevents potential damage.
Step 5: Connect AC Output (Optional)
If you want to integrate the inverter into your RV's AC power system, this step is essential.
-
Built-in AC wiring: For systems that include an integrated AC circuit, connect the inverter's output to your RV's breaker panel. Use a transfer switch or sub-panel to safely route the power.
-
Simpler setups: For a more straightforward installation, simply plug your appliances directly into the inverter's AC outlets.
This step depends on your RV's setup and how many devices you plan to power through the inverter.
Step 6: Test the System
Before you finish, you'll need to verify that everything is functioning correctly.
-
Double-check connections: Review all connections and ensure they are secure and correctly wired.
-
Power on and test: Switch on the inverter and test it with a small appliance to ensure it's delivering the right voltage.
-
Look for errors: Check the inverter for error lights, unusual sounds, or excessive heat. These could indicate wiring problems or other issues with the system.
Testing ensures that your RV inverter installation is successful and that everything works as expected before you hit the road.
Tips for Using and Maintaining Your RV Inverter
To ensure the long-term efficiency and reliability of your RV inverter, it's important to follow some basic maintenance and usage practices. These simple steps can help you avoid potential issues and maximize the lifespan of your equipment.
-
Regularly check connections: Over time, electrical connections can loosen or corrode. Periodically inspect your inverter's wiring and terminals to ensure they are secure and free from corrosion. Tighten loose connections as needed to maintain optimal performance.
-
Keep the inverter clean and dust-free: Dust and debris can accumulate on the inverter's surface, affecting its cooling ability. Make sure to wipe down the unit regularly with a soft cloth to prevent dust buildup, which can lead to overheating.
-
Don't overload the inverter: Always check the wattage requirements of your appliances and ensure the inverter is rated for the total load you plan to draw. Overloading the inverter can cause it to overheat, shut down, or even get damaged.
- Turn off the inverter when not in use: To preserve battery life, turn off the inverter when it's not in use. This will also help reduce energy consumption and protect the system from unnecessary wear.
By following these tips, you can keep your inverter running smoothly and extend its lifespan, ensuring that your RV's electrical system stays reliable throughout your travels.
FAQs About How to Hook Up Inverters for RVs
Q1: Can I install the inverter myself, or should I hire a professional?
If you're comfortable working with electrical systems and following safety procedures, you can install the inverter yourself. However, if you're uncertain or unfamiliar with RV electrical systems, it's best to hire a professional to ensure the inverter is installed safely and correctly. Incorrect installation can lead to damage or safety hazards.
Q2: Where should I mount the inverter in my RV?
For optimal performance, mount the inverter as close to the battery bank as possible to minimize voltage drop. Ensure the location is dry, well-ventilated, and away from flammable materials. Proper placement is key to efficient inverter performance and safety.
Final Words
Installing a power inverter in your RV is a game-changer, allowing you to bring the comfort of home with you, no matter where your adventures take you. Whether you're charging your devices, brewing coffee, or running a microwave, a reliable inverter ensures you can power your essential appliances with ease.
Topbull's RV power inverters can meet your power needs. Whether you require 2000W, 3000W, or 4000W of power, Topbull inverters provide efficient, durable, and easy-to-install solutions for every RV setup. Select the right inverter based on your energy needs, and enjoy the peace of mind that comes with dependable, consistent AC power on the road!